This guide describes a minimal SCHEMA stack deployment centered on SCHEMA lab and SCHEMA api, together with the supporting services they require in order to operate. It is written for developers and operators who want a practical starting point for bringing up the stack on Kubernetes using a combination of manifests, configuration snippets, and shell commands.
The examples in this guide assume that you already have access to a Kubernetes cluster. They can also be tested on a Minikube cluster, which is a convenient option for local or evaluation environments because it already provides an accessible cluster endpoint and a working storage class in many setups.
The source code and configuration examples in this guide are indicative. You should adapt image references, resource sizes, storage settings, networking details, and security-related configuration to the needs of your own environment.
Requirements
Before following this guide, make sure your environment satisfies the following requirements:
- A Kubernetes cluster running version 1.30 or earlier
- A
ReadWriteOncestorage class available in the cluster kubectlinstalled and configured with permissions to administer the target clusterhelminstalled for deploying Helm-managed components
Architecture
This guide deploys a minimal but functional SCHEMA stack on Kubernetes. The exact topology may vary across environments, but the following components are treated as the core building blocks for this setup:
SCHEMA lab, the user interface that works through SCHEMA apiSCHEMA api, the service responsible for containerized execution requests, execution data management and management of computational experiments- A PostgreSQL database for SCHEMA api persistence
- A MinIO deployment that provides S3-compatible object storage for computation-related files
TESK, which acts as the execution backend and submits workloads to Kubernetes as Jobs- A Redis instance used both as a cache and as an in-memory store for approved task submissions
- A set of SCHEMA workers that consume approved submissions and delegate them to TESK

The relationships between these components are important because they determine both the deployment order and the parts of the architecture that can be changed independently.
SCHEMA lab only communicates with SCHEMA api, so a SCHEMA lab deployment is meaningful only when a SCHEMA api deployment is already available. In turn, SCHEMA api currently depends on PostgreSQL as its relational database, which makes PostgreSQL a required part of the stack rather than an interchangeable default.
SCHEMA api also manages handles for input and output files through an S3-compatible storage interface. In this guide, that requirement is satisfied by MinIO. Although TESK may be able to work with other storage systems, this deployment keeps the storage layer aligned around the same S3-compatible approach for simplicity.
Approved tasks in SCHEMA api can be managed in different ways depending on the deployed fork or configuration. This guide uses Redis, which is one of the natively supported approaches. In this layout, Redis is not only a cache for the API but also the intermediate in-memory store used to track approved submissions before execution.
SCHEMA workers are responsible for translating generic computation metadata into backend-specific payloads, submitting those payloads to TESK, and following execution progress. Because of that role, they are tightly coupled to both Redis and TESK in this deployment.
Component deployment guide
The deployment steps in this guide should follow the dependency order described above so that each component is installed only after the services it relies on are already available.
A practical order for the stack is:
- PostgreSQL
- MinIO
- TESK
- Redis
- SCHEMA workers
- SCHEMA api
- SCHEMA lab
This order aligns with the requirements of the individual components:
- PostgreSQL must exist before SCHEMA api can start correctly.
- MinIO must be available before S3-backed file management can be configured.
- Redis and TESK must be ready before SCHEMA workers can process approved tasks.
- SCHEMA api must be available before SCHEMA lab can be configured to use it.
As this guide evolves, each of the components above can be expanded into a dedicated deployment subsection with concrete manifests, Helm commands, and configuration excerpts.
Prerequisites
Before deploying the individual components, create the namespaces that will be used to group the stack resources. In this guide, the deployment is split across the minio, tesk, and schema namespaces.
Apply the following manifest:
apiVersion: v1
kind: Namespace
metadata:
    name: minio
---
apiVersion: v1
kind: Namespace
metadata:
    name: tesk
---
apiVersion: v1
kind: Namespace
metadata:
    name: schema
Deploy a PostgreSQL database
The first component in the stack is a PostgreSQL database. Within this deployment, PostgreSQL is responsible for persisting the core data managed by SCHEMA api.
In this step, the guide provisions:
- a persistent volume claim for PostgreSQL data storage
- a secret containing the database credentials
- the PostgreSQL deployment itself
- a service for accessing PostgreSQL inside the cluster
This example uses the standard storage class, which is commonly available in Minikube environments. If your cluster uses a different storage class, update the manifest accordingly.
Running a highly available relational database inside a volatile Kubernetes environment introduces additional operational and consistency concerns that need careful handling. PostgreSQL operators can help manage such setups, but that falls outside the scope of this guide. The goal here is to provide a simple working stack suitable for local use and evaluation, not a production-grade database deployment.
Apply the following manifest:
apiVersion: v1
kind: Secret
metadata:
  namespace: schema
  name: postgres-credentials
type: Opaque
stringData:
  POSTGRES_DB: "schema-api"
  POSTGRES_USER: "schema-api"
  POSTGRES_PASSWORD: "schema-api"
---
apiVersion: v1
kind: PersistentVolumeClaim
metadata:
  name: postgres
  namespace: schema
spec:
  accessModes:
    - ReadWriteOnce
  storageClassName: standard
  resources:
    requests:
      storage: 10Gi
---
apiVersion: apps/v1
kind: Deployment
metadata:
  name: postgres
  namespace: schema
  labels:
    app: postgres
spec:
  replicas: 1
  selector:
    matchLabels:
      app: postgres
  template:
    metadata:
      labels:
        app: postgres
    spec:
      containers:
        - name: postgres
          image: postgres:18.0-alpine3.22
          ports:
            - containerPort: 5432
          envFrom:
            - secretRef:
                name: postgres-credentials
          volumeMounts:
            - name: data
              mountPath: /var/lib/postgresql/18/docker
      volumes:
        - name: data
          persistentVolumeClaim:
            claimName: postgres
---
apiVersion: v1
kind: Service
metadata:
  name: postgres
  namespace: schema
  labels:
    app: postgres
spec:
  type: ClusterIP
  selector:
    app: postgres
  ports:
    - name: postgres
      port: 5432
Deploy MinIO
The next step installs MinIO as the S3-compatible object store used for storing and managing input and output files for containerized computations.
As with PostgreSQL, this step provisions the core resources needed to run the service:
- a persistent volume claim using a RWO storage class (used
standardfor Minikube) - a secret containing the MinIO credentials
- the MinIO deployment
- a NodePort service exposing both the S3 API and the MinIO Console UI on ports
30900and30909
Apply the following manifest:
apiVersion: v1
kind: PersistentVolumeClaim
metadata:
  name: minio
  namespace: minio
spec:
  accessModes:
    - ReadWriteOnce
  storageClassName: standard
  resources:
    requests:
      storage: 10Gi
---
apiVersion: v1
kind: Secret
metadata:
  namespace: minio
  name: minio-credentials
type: Opaque
stringData:
  MINIO_ROOT_USER: "minio-admin"
  MINIO_ROOT_PASSWORD: "minio-password"
---
apiVersion: apps/v1
kind: Deployment
metadata:
  name: minio
  namespace: minio
  labels:
    app: minio
spec:
  replicas: 1
  selector:
    matchLabels:
      app: minio
  template:
    metadata:
      labels:
        app: minio
    spec:
      volumes:
        - name: data
          persistentVolumeClaim:
            claimName: minio
      containers:
        - name: minio
          image: quay.io/minio/minio:RELEASE.2025-04-22T22-12-26Z
          volumeMounts:
            - name: data
              mountPath: /data
          command:
            - minio
            - server
            - /data
            - --console-address
            - :9090
          ports:
            - containerPort: 9000
            - containerPort: 9090
          envFrom:
            - secretRef:
                name: minio-credentials
---
apiVersion: v1
kind: Service
metadata:
  name: minio
  namespace: minio
  labels:
    app: minio
spec:
  type: NodePort
  ports:
    - name: s3
      protocol: TCP
      port: 9000
      nodePort: 30900
    - name: minio
      protocol: TCP
      port: 9090
      nodePort: 30909
  selector:
    app: minio
After MinIO is deployed, create the S3 credentials that downstream services such as SCHEMA api and TESK will use to connect to it. Open the exposed MinIO Console service, sign in with the configured MinIO credentials, and navigate to Access keys > Create access key.
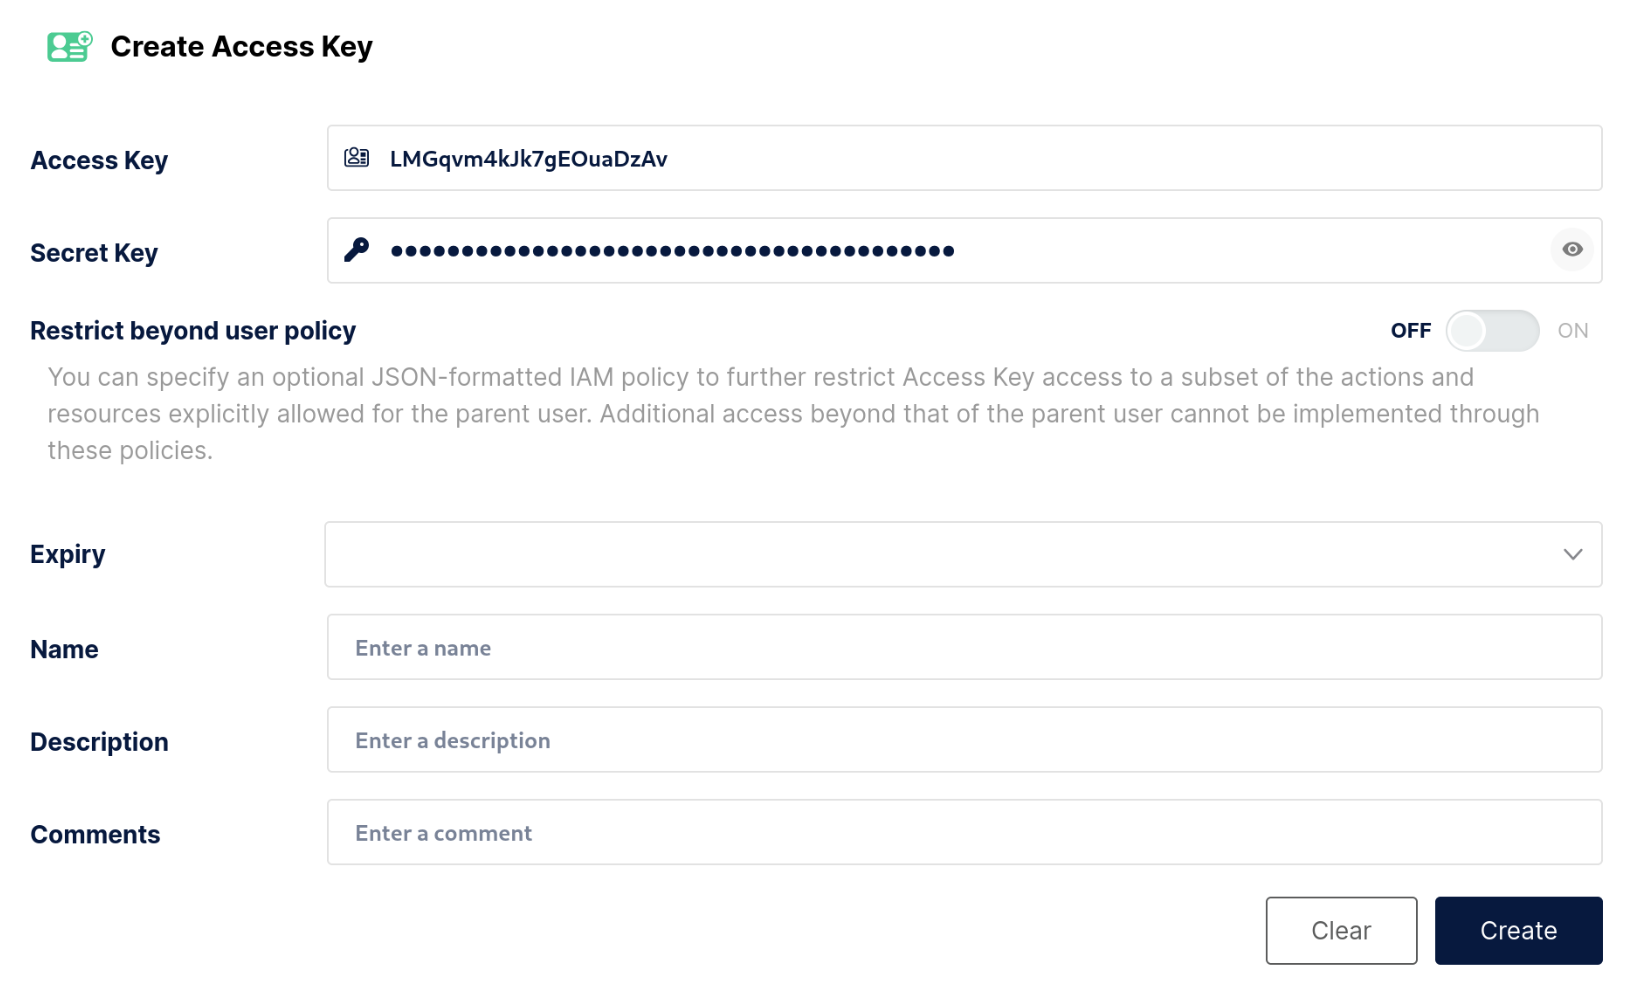
You may keep the default form values or adapt them if your environment requires different settings. After selecting Create, MinIO will issue an Access Key and a Secret Key. Store these values carefully, since they will be needed in the next steps. If they are lost, you will need to return to MinIO and issue a new credential pair.
Deploy TESK
The next component in the stack is TESK, which acts as the execution backend for containerized jobs on Kubernetes. Unlike the previous services in this guide, TESK is intended to be installed through Helm rather than from a single manifest.
Start by cloning the TESK repository and moving into the Helm chart directory:
git clone https://github.com/elixir-cloud-aai/TESK.git
cd TESK/charts/tesk/
At this point, prepare the S3 configuration files under s3-config/ so that TESK can use the MinIO deployment created in the previous step. Copy the template files to their final names by removing the -TEMPLATE suffix, then update them with the required values.
For the config file, set the in-cluster S3 endpoint:
[default]
endpoint_url=http://minio.minio.svc.cluster.local:9000
For the credentials file, provide the access key and secret key that were issued through the MinIO Console:
[default]
aws_access_key_id=LMGqvm4kJk7gEOuaDzAv
aws_secret_access_key=8D4mKso9VW0BIvxwtOs0Fg0BO81GhNbxYVQg3U4j
Next, update values.yaml with the minimum suggested settings for this stack. In the excerpt below, dotted keys are used to refer to nested values:
storage: s3
storageClass: standard
# This is required to be `v1` for the current version of the SCHEMA worker instances
tes_api_base_path: v1
service.type: "NodePort"
service.node_port: "30808"
ingress.rules: false
Once those changes are in place, deploy the chart into the tesk namespace with:
helm upgrade --install tesk . -f values.yaml -n tesk
Deploy Redis
Redis is used by both SCHEMA api and the SCHEMA workers in this stack. In this guide, it is deployed as a single Kubernetes Deployment together with a Service so that the dependent components can connect to it within the cluster.
Apply the following manifest:
apiVersion: apps/v1
kind: Deployment
metadata:
  name: redis
  namespace: schema
  labels:
    app: redis
spec:
  replicas: 1
  selector:
    matchLabels:
      app: redis
  template:
    metadata:
      labels:
        app: redis
    spec:
      containers:
        - image: redislabs/redisearch:latest
          name: redis
---
apiVersion: v1
kind: Service
metadata:
  name: redis
  namespace: schema
spec:
  selector:
    app: redis
  ports:
    - protocol: TCP
      port: 6379
Deploy SCHEMA workers
SCHEMA workers are the first components in this guide that are developed and maintained directly within the SCHEMA ecosystem. In principle, SCHEMA api can sit above different scheduling architectures for approved computation requests, but this guide uses the maintained SCHEMA workers because the selected stack is based on Redis and TESK.
In this setup, the workers run as a multi-replica Kubernetes Deployment that connects to both Redis and TESK in order to consume approved submissions, translate them into backend-specific requests, and track their execution progress.
Apply the following manifest:
apiVersion: apps/v1
kind: Deployment
metadata:
  name: schema-workers
  namespace: schema
  labels:
    app: schema-workers
spec:
  replicas: 3
  selector:
    matchLabels:
      app: schema-workers
  template:
    metadata:
      labels:
        app: schema-workers
    spec:
      containers:
        - image: schemaservices/schema-utils:0.1.0
          name: schema-worker
          command:
            - 'python'
            - '-m'
            - 'brokers.tesk'
            - '-v'
            - '3'
            - 'redis://redis.schema.svc.cluster.local:6379'
            - 'http://tesk-api.tesk.svc.cluster.local:8080'
Deploy SCHEMA api
SCHEMA api is the core component of the stack and is the service through which users manage computational experiments. Because it is configurable, its deployment involves several resources:
- a ConfigMap containing the main SCHEMA api configuration
- a Secret containing the SCHEMA api secret key
- a Secret containing the issued S3 credentials, encoded in base64
- the main SCHEMA api Deployment
- a separate watchdog Deployment used to synchronize computation status and results with the local database
Before applying the manifest, it is worth highlighting some of the configuration values used in this example:
ALLOWED_HOSTSdefines the hosts on which SCHEMA api is expected to respond. In this guide, it can be set to the Minikube IP.S3_URLshould be set to the public URL through which the S3 service is reachable.CORS_ALLOW_ALL_ORIGINSallows requests from any origin and should be evaluated carefully for production use.
The S3 URL passed to SCHEMA api should be the publicly accessible address for S3, since SCHEMA api uses it to presign upload URLs for end users. If the URL is not reachable by end users, uploads will fail.
Deploying users should re-evaluate the configured CORS policy for their own use case. If SCHEMA api is intended to be used only by specific applications or services, the allowed origins should be configured explicitly. Allowing all origins may be appropriate only when SCHEMA api is intentionally exposed as a public API.
For a complete list of supported configuration values, refer to the SCHEMA api configuration settings page.
The remaining SCHEMA api requirements, including PostgreSQL connectivity and the Redis-based delegation mechanism, are already covered by the previous deployment steps.
Apply the following manifest:
apiVersion: v1
kind: Secret
metadata:
  name: schema-api-secret-key
  namespace: schema
data:
  secretKey: c2FtcGxlLXNlY3JldC1rZXk=
---
apiVersion: v1
kind: Secret
metadata:
  name: s3-credentials
  namespace: schema
data:
  access_key_id: TE1HcXZtNGtKazdnRU91YUR6QXY=
  secret_access_key: OEQ0bUtzbzlWVzBCSXZ4d3RPczBGZzBCTzgxR2hOYnhZVlFnM1U0ag==
---
apiVersion: v1
kind: ConfigMap
metadata:
  name: schema-api-config
  namespace: schema
  labels:
    app: schema-api
data:
  allowedHosts: "192.168.49.2"
  s3Url: "http://192.168.49.2:30900"
  s3UseSSL: "no"
  s3MaxPartSize: "104857600"
  filesEnabled: "yes"
  authEnabled: "yes"
  corsAllowAllOrigins: "yes"
  cacheEnabled: "yes"
  cacheTimeout: "15"
  redisHost: "redis"
  managerClassArgs: '{"redis_tesk_06_2025": {"host":"redis"}}'
---
apiVersion: v1
kind: ConfigMap
metadata:
  name: schema-api-managers-config
  namespace: schema
  labels:
    app: schema-api
data:
  managers.yaml: |
    managers:
      - name: redis_tesk_06_2025
        class_path: 'core.managers.redis.RedisExecutionManager'
        enabled: yes
        configuration:
          delegate_tasks: yes
          workflows:
            languages:
              - language: SNWL
                versions: '*'
                use_definition: yes
---
apiVersion: apps/v1
kind: Deployment
metadata:
  name: schema-api
  namespace: schema
  labels:
    app: schema-api
spec:
  strategy:
    type: Recreate
  replicas: 1
  selector:
    matchLabels:
      app: schema-api
  template:
    metadata:
      labels:
        app: schema-api
    spec:
      containers:
        - image: schemaservices/schema-api:ssdbm2025
          imagePullPolicy: Always
          name: schema-api
          volumeMounts:
            - name: managers-config-volume
              mountPath: /config
              readOnly: true
          env:
            - name: SCHEMA_API_DB_HOST
              value: postgres.schema.svc.cluster.local
            - name: SCHEMA_API_DB_NAME
              valueFrom:
                secretKeyRef:
                  name: postgres-credentials
                  key: POSTGRES_DB
            - name: SCHEMA_API_DB_USER
              valueFrom:
                secretKeyRef:
                  name: postgres-credentials
                  key: POSTGRES_USER
            - name: SCHEMA_API_DB_PASSWORD
              valueFrom:
                secretKeyRef:
                  name: postgres-credentials
                  key: POSTGRES_PASSWORD
            - name: SCHEMA_API_DB_PORT
              value: "5432"
            - name: SCHEMA_API_ALLOWED_HOSTS
              valueFrom:
                configMapKeyRef:
                  name: schema-api-config
                  key: allowedHosts
            - name: SCHEMA_API_SECRET_KEY
              valueFrom:
                secretKeyRef:
                  name: schema-api-secret-key
                  key: secretKey
            - name: SCHEMA_API_USE_FILES
              valueFrom:
                configMapKeyRef:
                  name: schema-api-config
                  key: filesEnabled
            - name: SCHEMA_API_USE_AUTH
              valueFrom:
                configMapKeyRef:
                  name: schema-api-config
                  key: authEnabled
            - name: SCHEMA_API_S3_URL
              valueFrom:
                configMapKeyRef:
                  name: schema-api-config
                  key: s3Url
            - name: SCHEMA_API_S3_USE_SSL
              valueFrom:
                configMapKeyRef:
                  name: schema-api-config
                  key: s3UseSSL
            - name: SCHEMA_API_S3_VERIFY_SSL
              valueFrom:
                configMapKeyRef:
                  name: schema-api-config
                  key: s3UseSSL
            - name: SCHEMA_API_S3_MAX_PART_SIZE_BYTES
              valueFrom:
                configMapKeyRef:
                  name: schema-api-config
                  key: s3MaxPartSize
            - name: SCHEMA_API_S3_ACCESS_KEY_ID
              valueFrom:
                secretKeyRef:
                  name: s3-credentials
                  key: access_key_id
            - name: SCHEMA_API_S3_SECRET_ACCESS_KEY
              valueFrom:
                secretKeyRef:
                  name: s3-credentials
                  key: secret_access_key
            - name: SCHEMA_API_CORS_ALLOW_ALL_ORIGINS
              valueFrom:
                configMapKeyRef:
                  name: schema-api-config
                  key: corsAllowAllOrigins
            - name: SCHEMA_API_ENABLE_CACHE
              valueFrom:
                configMapKeyRef:
                  name: schema-api-config
                  key: cacheEnabled
            - name: SCHEMA_API_CACHE_REDIS_HOST
              valueFrom:
                configMapKeyRef:
                  name: schema-api-config
                  key: redisHost
            - name: SCHEMA_API_CACHE_TIMEOUT_SECONDS
              valueFrom:
                configMapKeyRef:
                  name: schema-api-config
                  key: cacheTimeout
            - name: SCHEMA_API_WORKFLOWS_MANAGER_CLASS_ARGS
              valueFrom:
                configMapKeyRef:
                  name: schema-api-config
                  key: managerClassArgs
            - name: SCHEMA_API_MANAGER_CONFIG_PATH
              value: /config/managers.yaml
      volumes:
        - name: managers-config-volume
          configMap:
            name: schema-api-managers-config
---
apiVersion: apps/v1
kind: Deployment
metadata:
  name: schema-api-watch
  namespace: schema
  labels:
    app: schema-api-watch
spec:
  strategy:
    type: Recreate
  replicas: 1
  selector:
    matchLabels:
      app: schema-api-watch
  template:
    metadata:
      labels:
        app: schema-api-watch
    spec:
      containers:
        - image: schemaservices/schema-api:4292160
          name: schema-api-watch
          command:
            - 'python'
            - 'manage.py'
            - 'watch'
            - '-v'
            - '3'
            - 'executions'
            - '-i'
            - '5'
          volumeMounts:
            - name: managers-config-volume
              mountPath: /config
              readOnly: true
          env:
          - name: SCHEMA_API_DB_HOST
            value: postgres.schema.svc.cluster.local
          - name: SCHEMA_API_DB_NAME
            valueFrom:
              secretKeyRef:
                name: postgres-credentials
                key: POSTGRES_DB
          - name: SCHEMA_API_DB_USER
            valueFrom:
              secretKeyRef:
                name: postgres-credentials
                key: POSTGRES_USER
          - name: SCHEMA_API_DB_PASSWORD
            valueFrom:
              secretKeyRef:
                name: postgres-credentials
                key: POSTGRES_PASSWORD
          - name: SCHEMA_API_DB_PORT
            value: "5432"
          - name: SCHEMA_API_ALLOWED_HOSTS
            valueFrom:
              configMapKeyRef:
                name: schema-api-config
                key: allowedHosts
          - name: SCHEMA_API_SECRET_KEY
            valueFrom:
              secretKeyRef:
                name: schema-api-secret-key
                key: secretKey
          - name: SCHEMA_API_USE_FILES
            valueFrom:
              configMapKeyRef:
                name: schema-api-config
                key: filesEnabled
          - name: SCHEMA_API_USE_AUTH
            valueFrom:
              configMapKeyRef:
                name: schema-api-config
                key: authEnabled
          - name: SCHEMA_API_S3_URL
            valueFrom:
              configMapKeyRef:
                name: schema-api-config
                key: s3Url
          - name: SCHEMA_API_S3_USE_SSL
            valueFrom:
              configMapKeyRef:
                name: schema-api-config
                key: s3UseSSL
          - name: SCHEMA_API_S3_VERIFY_SSL
            valueFrom:
              configMapKeyRef:
                name: schema-api-config
                key: s3UseSSL
          - name: SCHEMA_API_S3_MAX_PART_SIZE_BYTES
            valueFrom:
              configMapKeyRef:
                name: schema-api-config
                key: s3MaxPartSize
          - name: SCHEMA_API_S3_ACCESS_KEY_ID
            valueFrom:
              secretKeyRef:
                name: s3-credentials
                key: access_key_id
          - name: SCHEMA_API_S3_SECRET_ACCESS_KEY
            valueFrom:
              secretKeyRef:
                name: s3-credentials
                key: secret_access_key
          - name: SCHEMA_API_CORS_ALLOW_ALL_ORIGINS
            valueFrom:
              configMapKeyRef:
                name: schema-api-config
                key: corsAllowAllOrigins
          - name: SCHEMA_API_ENABLE_CACHE
            valueFrom:
              configMapKeyRef:
                name: schema-api-config
                key: cacheEnabled
          - name: SCHEMA_API_CACHE_REDIS_HOST
            valueFrom:
              configMapKeyRef:
                name: schema-api-config
                key: redisHost
          - name: SCHEMA_API_CACHE_TIMEOUT_SECONDS
            valueFrom:
              configMapKeyRef:
                name: schema-api-config
                key: cacheTimeout
          - name: SCHEMA_API_WORKFLOWS_MANAGER_CLASS_ARGS
            valueFrom:
              configMapKeyRef:
                name: schema-api-config
                key: managerClassArgs
          - name: SCHEMA_API_MANAGER_CONFIG_PATH
            value: /config/managers.yaml
        volumes:
          - name: managers-config-volume
            configMap:
              name: schema-api-managers-config
---
apiVersion: v1
kind: Service
metadata:
  name: schema-api
  namespace: schema
spec:
  selector:
    app: schema-api
  type: NodePort
  ports:
    - protocol: TCP
      port: 8000
      nodePort: 30800
After the successful installation, connect to the provisioned SCHEMA api pod and apply the database migrations by running:
python manage.py migrate
To start using the API, create an application service and issue an API key for it. The following commands register a test application service and issue an API key valid for one year:
python manage.py application_service register test
python manage.py application_service for test apikeys issue -d 1y
Save the issued API key, since it will be needed to register users and contexts for that application service.
Deploy SCHEMA lab
The final component in this guide is SCHEMA lab, which provides a user-facing interface on top of SCHEMA api. Its installation is comparatively straightforward and requires:
- a ConfigMap containing minimal configuration
- a Deployment for the SCHEMA lab SPA
- a service that exposes it
Apply the following manifest:
apiVersion: v1
kind: ConfigMap
metadata:
  name: schema-lab-config
  namespace: schema
data:
  schemaApiUrl: http://192.168.49.2:30800
---
apiVersion: apps/v1
kind: Deployment
metadata:
  name: schema-lab
  namespace: schema
spec:
  replicas: 1
  selector:
    matchLabels:
      app: schema-lab
  template:
    metadata:
      labels:
        app: schema-lab
    spec:
      containers:
        - name: schema-lab
          image: schemaservices/schema-lab:20251127
          env:
            - name: SCHEMA_LAB_SCHEMA_API_URL
              valueFrom:
                configMapKeyRef:
                  name: schema-lab-config
                  key: schemaApiUrl
---
apiVersion: v1
kind: Service
metadata:
  name: schema-lab
  namespace: schema
spec:
  selector:
    app: schema-lab
  type: NodePort
  ports:
    - protocol: TCP
      port: 80
      nodePort: 30080
Final overview
At this point, the guide has provisioned a full working stack composed of:
- PostgreSQL for SCHEMA api persistence
- MinIO for S3-compatible object storage
- TESK as the execution backend
- Redis as the intermediate in-memory store
- SCHEMA workers for delegating approved computations to TESK
- SCHEMA api as the central service for managing computational experiments
- SCHEMA lab as the UI on top of SCHEMA api
The services exposed through NodePorts in this setup are:
- SCHEMA lab:
30080 - SCHEMA api:
30800 - TESK:
30808 - S3 (MinIO):
30900 - MinIO Console:
30909
This guide is intended as a proof of concept for bringing up a minimal SCHEMA stack. The exact deployment steps, exposed services, storage configuration, and runtime settings should be adapted to the requirements and constraints of the target environment.